
VM Consolidation is a feature in vSphere 4.0U2. What does this feature do and how does this really stick with VM snapshots? To get a better view, one should have knowledge in snapshots feature and snapshot manager. What are snapshots? It is very much similar to a well known feature called system restore that you would have come across in Windows OS, similar to that snapshot is a feature in VMware where it copies the Virtual machine disk file at certain point of time. A simple example would be to consider your friend walking towards you from the other side of the road. Now if you take a still picture of him with a camera that can be considered as a snapshot and if you go for video recording the entire activity of your friend with the camera, then that can be called as a backup.
Snapshots can be also called as lifesavers as they can revert back to the original state of operating system when something goes wrong. Reverting back to the snapshot will not take a long time like building an operating system, as this can be done less than 4 to 5 minutes. Snapshot feature can be enabled and scheduled and can be reverted to any date as per the requirement. Snapshots enabled Virtual machine can expect performance issues as the usage of the disk and memory is utilized more.
How a snapshot affects performance
Snapshots have an adverse impact on the performance of the server in several ways. When you first create a snapshot, the VM activity will pause briefly; if you ping a VM while creating a snapshot you will notice a few timeouts. Also, creating a snapshot causes metadata updates, which can cause SCSI reservations conflicts that briefly lock the LUN. As a result, the LUN will be available exclusively to a single host for a brief period of time.
If you’ve created a snapshot of a VM, and run the VM, the snapshot is active. If a snapshot is active, the performance of the VM will be degraded because the host writes to delta files differently and less efficiently than it does to standard VMDK files. Also, as the delta file grows by each 16 MB increment, it will cause another metadata lock. This can affect your VMs and hosts.
Finally, deleting/committing a snapshot also creates a metadata lock. In addition, the snapshot you are deleting can create greatly reduced performance on its VM while the delta files are being committed; this will be more noticeable if the VM is very busy. To avoid this problem, it’s better to delete large/numerous snapshots during off-peak hours when the host server is less busy.
Deleting snapshots
To improve the performance issues, system administrators delete the old snapshots or delete the entire snapshots from snapshot manager on a regular basis. “Delete” will simply merge or consolidate the child or delta disks with the parent or with another child disk, depending on the part of the chain where the task is performed. After all of the changes are committed, it deletes the snapshot files. If your VM is “sitting” at the last snapshot in the chain, you should be able to do a “Delete All” and commit the changes in the snapshot to the parent disk.
When deleting snapshots through the vSphere Client, the task status bar can be misleading. Generally, the task status jumps to 95% complete fairly quickly, but you’ll notice it will stay at 95% without changing until the entire commit process is completed. vCenter, however, has an automatic 15 minute timeout, so for the most part this message can be ignored. To manually check the status of a snapshot deletion, check the data store browser in the vSphere Client. When the delta file disappears, you can make sure that the snapshots have been deleted.
Well, be careful when going for “Delete All”. I can explain with a scenario. Assume you got three snapshots (snapshot_1 – 20GB, snapshot_2 – 10GB and snapshot_3 – 30GB); and when you choose “Delete All” the following will happen:
- Snapshot_2 will grow to 40GB approx.
- Snapshot_1 will grow to 60GB approx.
- Snapshot_1 will be committed to the original VMDK file
- All snapshot files are deleted
To make it simpler: Snapshot 3 is merged into Snapshot 2, Snapshot 2 is merged into Snapshot 1, Snapshot 1 is merged into the original vmdk file and afterwards all snapshot files are deleted. This means that if you want to delete all snapshots at once you will need around 130GB of free disk space. So think twice when you press the “Delete All” button.
Another doubt that can arise here is what happens if you are deleting snapshot_2 initially instead of snapshot_3.
Consider the snapshot tree to look like this:
- SnapshotA_1
- Snapshot_2
- Snapshot_3
- Current vmdk file
When you took snapshot_1, the main vmdk file was frozen and a new delta file was created. All changes were written to the delta file from that point onwards. Later when you took snapshot_2, the first delta file was frozen and another delta file was created. All changes were written to this new delta file from that point onwards. And finally, when you took snapshot_3, the second delta file was frozen and yet another delta file was created, representing the “Current” state. All changes that are happening now are written to this file and it goes.
So when you delete snapshot_2, the first delta file will be merged with the second delta file which represents snapshot_3. So the file backing snapshot_3 will change but the actual state of snapshot_3 won’t change. In other words, deleting snapshot_2 pushes those changes to the next file down in the tree which depends on those changes, ie: snapshot_3. No changes are made to snapshot_1 during this event.
Now we can check another scene where you want to delete snapshot_3 initially, then snapshot_2 will become snapshot_3 but will retain its name. By deleting, you are committing the changes you made to snapshot_3 up to snapshot_2. If you do not want to do that (ie: retain original snapshot_2 while deleting snapshot_3), you have to ‘Go to’ snapshot_2 before making the delete, like this:
- Snapshot_1
- Snapshot_2
- You are here (Current vmdk file)
- Snapshot_3
- Snapshot_2
Consolidation process: Server consolidation suite in increased the utilization of the existing hardware. The main functionality of server consolidation is to check the parent disk and remove the old deleted snapshots. This server consolidation can reduce the hardware requirements and increase the utilization effectively.
How consolidation works is that instead of rolling the snapshots into each other, the snapshot process now takes the oldest snapshot and consolidates that into the base disk, removes the snapshot and then processes the next oldest snapshot and merges that into the base disk, so after each snapshot is consolidated into the base disk it is removed. This not only saves on required disk space, but it also performs better.
If you haven’t seen it, here it is:
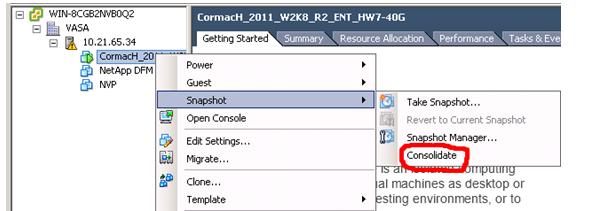
Also within the vSphere Client, you can add a column to the view to display if the virtual machine needs to have consolidation performed.
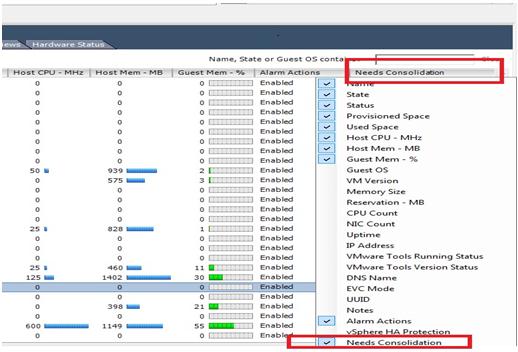
By this you can ensure that any snapshots that are disconnected from the virtual machine, or are otherwise in play on the disk for the virtual machine, are corrected.
But how do we know whether a Consolidate was successful? Well, if a delete operation didn’t manage to merge the snapshot child or delta disks into the base vmdk file, a new warning is displayed in the GUI as shown:

This helps the user to use the Snapshot Consolidate option to merge the snapshots. There may be occasions where using the Consolidate option does not work. A snapshot configuration file (with the .vmsd extension) in the virtual machine directory may interfere with consolidation of the snapshots, and it may be necessary to rename it, moved it to a new location, or delete it.