
- Install Open VPN RPM.
Dependencies
- openssl
- lzo
- pkcs11-helper
Download openvpn-<version>.rpm , And install using this command rpm -ivh openvpn-<version>.rpm
-
- It will create folder under /etc/openvpn and /usr/share/doc/openvpn-2.1.1
cp -r /usr/share/doc/openvpn-<version>/easy-rsa /etc/openvpn
cp -r /usr/share/doc/openvpn-<version>/sample-config-files/server.conf /etc/openvpn
we have to copy the “easy-rsa” folder and “server.conf” file from /user/share/doc/openvpn-<version>… to…. /etc/openvpn - Then go to /etc/openvpn
cd /etc/openvpn - Then go to easy-rsa/2.0
cd easy-rsa/2.0 - Edit “vars” file modify values in last 5 lines.
export KEY_COUNTRY=”YOURCOUNTRY”
export KEY_PROVINCE=”YOURSTATE”
export KEY_CITY=”YOURCITY”
export KEY_ORG=”YOURORG”
export KEY_EMAIL=”exuser@host.yourdomain.com“ - Run the “vars” file
. ./vars (note there is two dots) - To clear old keys run the “clear-all” file. If the folder does not exist it will create the folder.
./clear-all (here one dot is enough) - Then run “bulid-ca” and “bulid-dh” files.
./bulid-ca
(While running this command just enter for all options. But you have to answer for common_name option Give the Server’s Host Name or Any Name).
./build-dh
It will generate “ca.crt”, “ca.key” and “dh1024.pem” files under “keys” folder. - Then run “bulid-key-server” to generate server key.
./build-key-server <“Server-Name”>
While running the above command it will prompt you to get input just give enter for every prompt.
It will generate “Server-Name.crt” , “Server-Name.csr” and “Server-Name.key” under “keys” folder. - Then go to /etc/openvpn folder
cd /etc/openvpn - Now we have to edit the “server.conf” file.
vi server.conf
#This is sample configuration file- local 192.168.1.101
- port 1194
- proto udp
- dev tun
- ca ca.crt
- cert host.yourdomain.com.crt
- key host.yourdomain.com.key # This file should be kept secret
- dh dh1024.pem
- server 192.168.11.0 255.255.255.248
- ifconfig-pool-persist ipp.txt
- push “route 172.23.0.0 255.255.0.0” # YOURORG LOCAL Network
- client-config-dir ccd
- route 192.168.12.0 255.255.255.0 # For Individual Clients
- client-to-client
- keepalive 10 120
- comp-lzo
- user nobody
- group nobody
- persist-key
- persist-tun
- status openvpn-status.log
- log-append openvpn.log
- verb 3
- Line 1 : local 192.168.1.101
Which IP address “openvpn” has to look in the system. - Line 2 : port 1194
Which Port number “openvpn” has to run in the system. - Line 3 : proto udp
Which Protocol “openvpn” has to use.
(tcp/udp) udp is best. - Line 4 : dev tun
Which device it has to use to assign “Virtual IP”
(tap/tun) tun is best. - Line 5 : ca ca.crt
- Line 6 : cert <Server-Name>.crt
- Line 7 : key <Server-Name>.key # This file should be kept secret
- Line 8 : dh dh1024.pem
For Line number 5 to 8 we have to say the path of the files. So we have to copy the “ca.crt “ , “<Server-Name>.crt” ,”<Server-Name>.key” and “dh1024.pem” in the same folder is good. Otherwise we can give the path where these files present. - Line 9 : server 192.168.11.0 255.255.255.248
This line is to assign IP address for the server. Here I have planed to assign 192.168.11.1 – 192.168.11.2 to server and different IP ranges for clients. - Line 10 : ifconfig-pool-persist ipp.txt
This line contains the IP pool list of clients. But here we are going to use static IP for each clients. So It is not necessary for us. - Line 11 : push “route 172.23.0.0 255.255.0.0”
These Line : 11 for routing the local network to clients. Then only clients can access these networks. It will take effect on all VPN-CLIENTS. - Line 12: client-config-dir ccd
These line is for We can customize the client configuration. So we have to create a directory named “ccd” under “/etc/openvpn” and inside the “ccd” directory we have to create client customized file. - Line 13 : route 192.168.12.0 255.255.255.0 for Individual vpn network.
- Line 14 : client-to-client
This is for clients can access the each other clients. - Line 15 : keepalive 10 120
To refresh the connection - Line 16 : comp-lzo
- Line 17 : user nobody
- Line 18 : group nobody
These above two lines only useful for Linux server. - Line 19 : persist-key
- Line 20 : persist-tun
- Line 21 : status openvpn-status.log
It is to view the current status of the connection. - Line 22 : log-append openvpn.log
It is to append the status of the server in a log file. - Line 23 : verb 3
It is for verbose level.
- Now we are going to start the VPN Server. Before that we have to verify that we have copied every thing in the current folder “/etc/openvpn”.
- File 1. ca.crt
- File 2. dh1024.pem
- File 3. <Server-Name>.crt
- File 4. <Server-Name>.csr
- File 5. <Server-Name>.key
- It will create folder under /etc/openvpn and /usr/share/doc/openvpn-2.1.1
Start the service using the command service openvpn start command.
For Auto start the service when booting the machine type the command chkconfig openvpn on
-
Previous Post
Networking Concepts, in RHEL 7 or CENTOS7.
-
Next Post
Network Installation on Linux using NFS
Related Posts

May 7, 2026
How Do You Fix the “Bandwidth Limit Exceeded” Error and Prevent Website Shutdowns?
You fix the “509 Bandwidth Limit Exceeded” error by increasing the monthly data quota in…

May 2, 2026
Why Your Linux Server Is a Target for Bots? How to Block the Bots
Summary: Protecting Linux Servers from Bots & Brute Force Attacks Automated bots constantly scan the…

April 20, 2026
Firefox 149 Built-In VPN: The Truth About Your Browser’s Hidden Privacy Leak
What You Need to Know: Firefox 149 Built-In VPN Direct Impact Analysis Firefox 149 features…

April 18, 2026
Your Server Is Sending Spam Without You Knowing: A Cybersecurity Risk in Web Hosting
Crunch Points: How to Stop Unauthorized Server Spam To stop unauthorized server spam, you must…

April 18, 2026
Your Logs Are Telling You Something: Why Ignoring Server Logs Leads to Major Outages (And How to Fix It)
What You Need to Know: How to Prevent Infrastructure Outages with Server Log Analysis Server…

April 18, 2026
Too Many Users Have Access to Your Server: Why Poor IAM Leads to Data Breaches
Key Takeaways: The Critical Link Between IAM and Data Breaches Poor Identity and Access Management…

April 17, 2026
Why “Strong Passwords” Are Obsolete: The 2026 Token-Stealing Attack That Bypasses MFA
Quick Breakdown: Your Browser Is the New Security Hole Strong passwords and traditional MFA have…
April 15, 2026
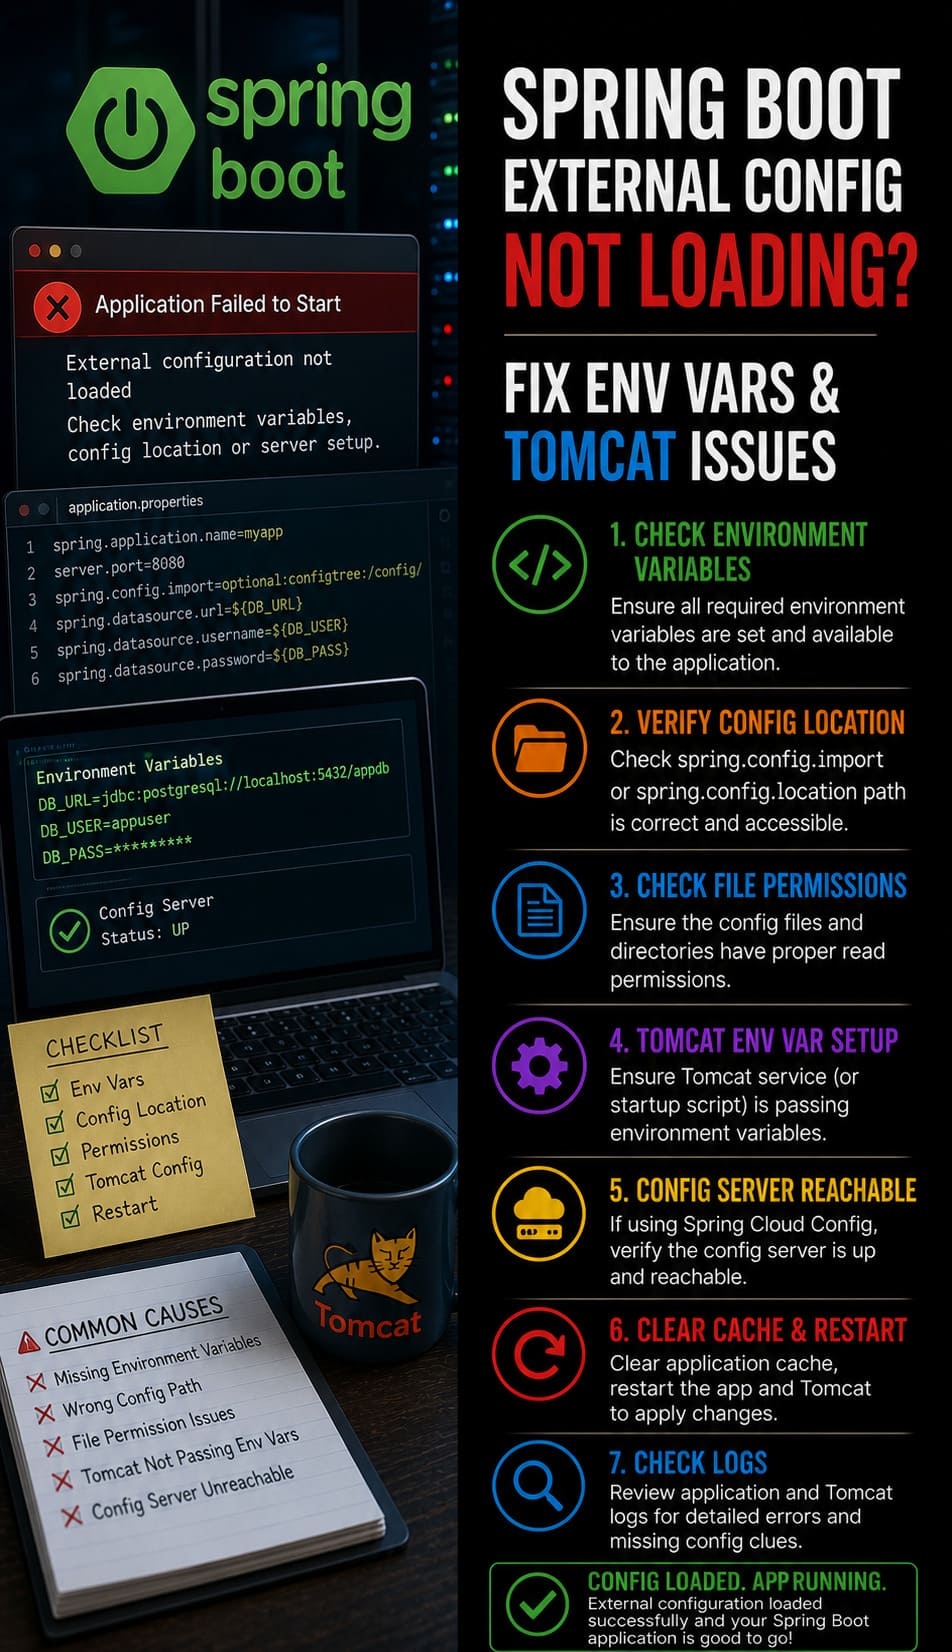
Spring Boot External Config Not Loading? Fix Env Vars & Tomcat Issues
Summary: Spring Boot external configurations fail to load when the application defaults to internal classpath…

April 14, 2026
Server Monitoring Issues: Definition, Tools, and Expert Failure Resolution
Overviews and Technical Extraction Server monitoring issues occur when tracking agents fail, telemetry data gaps…

April 14, 2026
Apache Server High CPU Usage: A Comprehensive Root Cause Analysis and Fix Guide
What you need to Know: To fix Apache server high CPU usage, you must tune…


